I have completed another painting of my favourite flowers, Irises. This time I have looked at big bold dark purple ones. This is painted in acrylic on canvas, and will be for sale, at an exhibition later in the year.
So here is a sneak preview of the finished painting followed by the stages of painting to create it.

I have worked from photographs, that I took last summer.
My first stage was to draw the outlines. I used a canvas painted red, as I am not keen on working on white backgrounds. I used pencil initially, and then went over the pencil with white acrylic paint using a size 1 brush.
 Next I start to fill in some of the background colours for the flowers.
The next two stages show how I develop the detail on the flowers, with layers of acrylic. I have exaggerated light and shade contrasts to make the flowers more visually interesting. The original photos had very little contrast, and looked fairly flat. I am using Chromacolour acrylic and AV Vallejo acrylic gouache for the detail. I am using brush size 2 down to 00 at this stage.
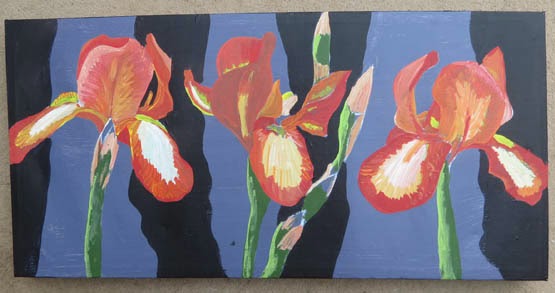
I have started to add some oranges, reds and yellows in the background. The yellow is placed under the darkest part of the petals, to make the purple stand out more.

Here is my finished painting, in my studio. I have added masses more detail to the background, so the flowers are surrounded by swirls of hot colours. The background is painted in many layers of dots. This is time consuming but worth the effort, as it adds so much to the depth of the painting. I rarely have a plain background on any of my paintings,


So here is a sneak preview of the finished painting followed by the stages of painting to create it.
My first stage was to draw the outlines. I used a canvas painted red, as I am not keen on working on white backgrounds. I used pencil initially, and then went over the pencil with white acrylic paint using a size 1 brush.
The next two stages show how I develop the detail on the flowers, with layers of acrylic. I have exaggerated light and shade contrasts to make the flowers more visually interesting. The original photos had very little contrast, and looked fairly flat. I am using Chromacolour acrylic and AV Vallejo acrylic gouache for the detail. I am using brush size 2 down to 00 at this stage.
I have started to add some oranges, reds and yellows in the background. The yellow is placed under the darkest part of the petals, to make the purple stand out more.
Here is my finished painting, in my studio. I have added masses more detail to the background, so the flowers are surrounded by swirls of hot colours. The background is painted in many layers of dots. This is time consuming but worth the effort, as it adds so much to the depth of the painting. I rarely have a plain background on any of my paintings,
Some close ups to show technique.
Here is another photo of the finished painting.
This is for sale on Artfinder. There is a link on the sidebar.
Thanks for looking. Comments always appreciated.